> ## Documentation Index
> Fetch the complete documentation index at: https://docs.runcomfy.com/llms.txt
> Use this file to discover all available pages before exploring further.
# Custom Workflows
This guide shows how to **create**, **test**, and **Cloud Save** your own ComfyUI workflows in RunComfy’s cloud environment, then deploy them via **Serverless API (ComfyUI)**.
***
## Overview
In RunComfy, workflows are node-based graphs built in a cloud-hosted ComfyUI session. When your workflow is ready, you can **Cloud Save** it, which packages the workflow *and its full runtime* (drivers, libraries, custom nodes, models, dependencies) into a reproducible container image.
Once Cloud Saved, you can deploy the workflow as a **serverless API endpoint** (a Deployment) and call it from your application.
> Note: Workflows in RunComfy are kept in sync with the official [ComfyUI GitHub repository](https://github.com/comfyanonymous/ComfyUI) (including historical versions), so you can work in an interface that matches your local setup. We also keep older ComfyUI versions available, so you can switch to an earlier version if needed.
***
## Build a workflow
You can start from scratch or use a community workflow as a template.
### Option A: Start from scratch
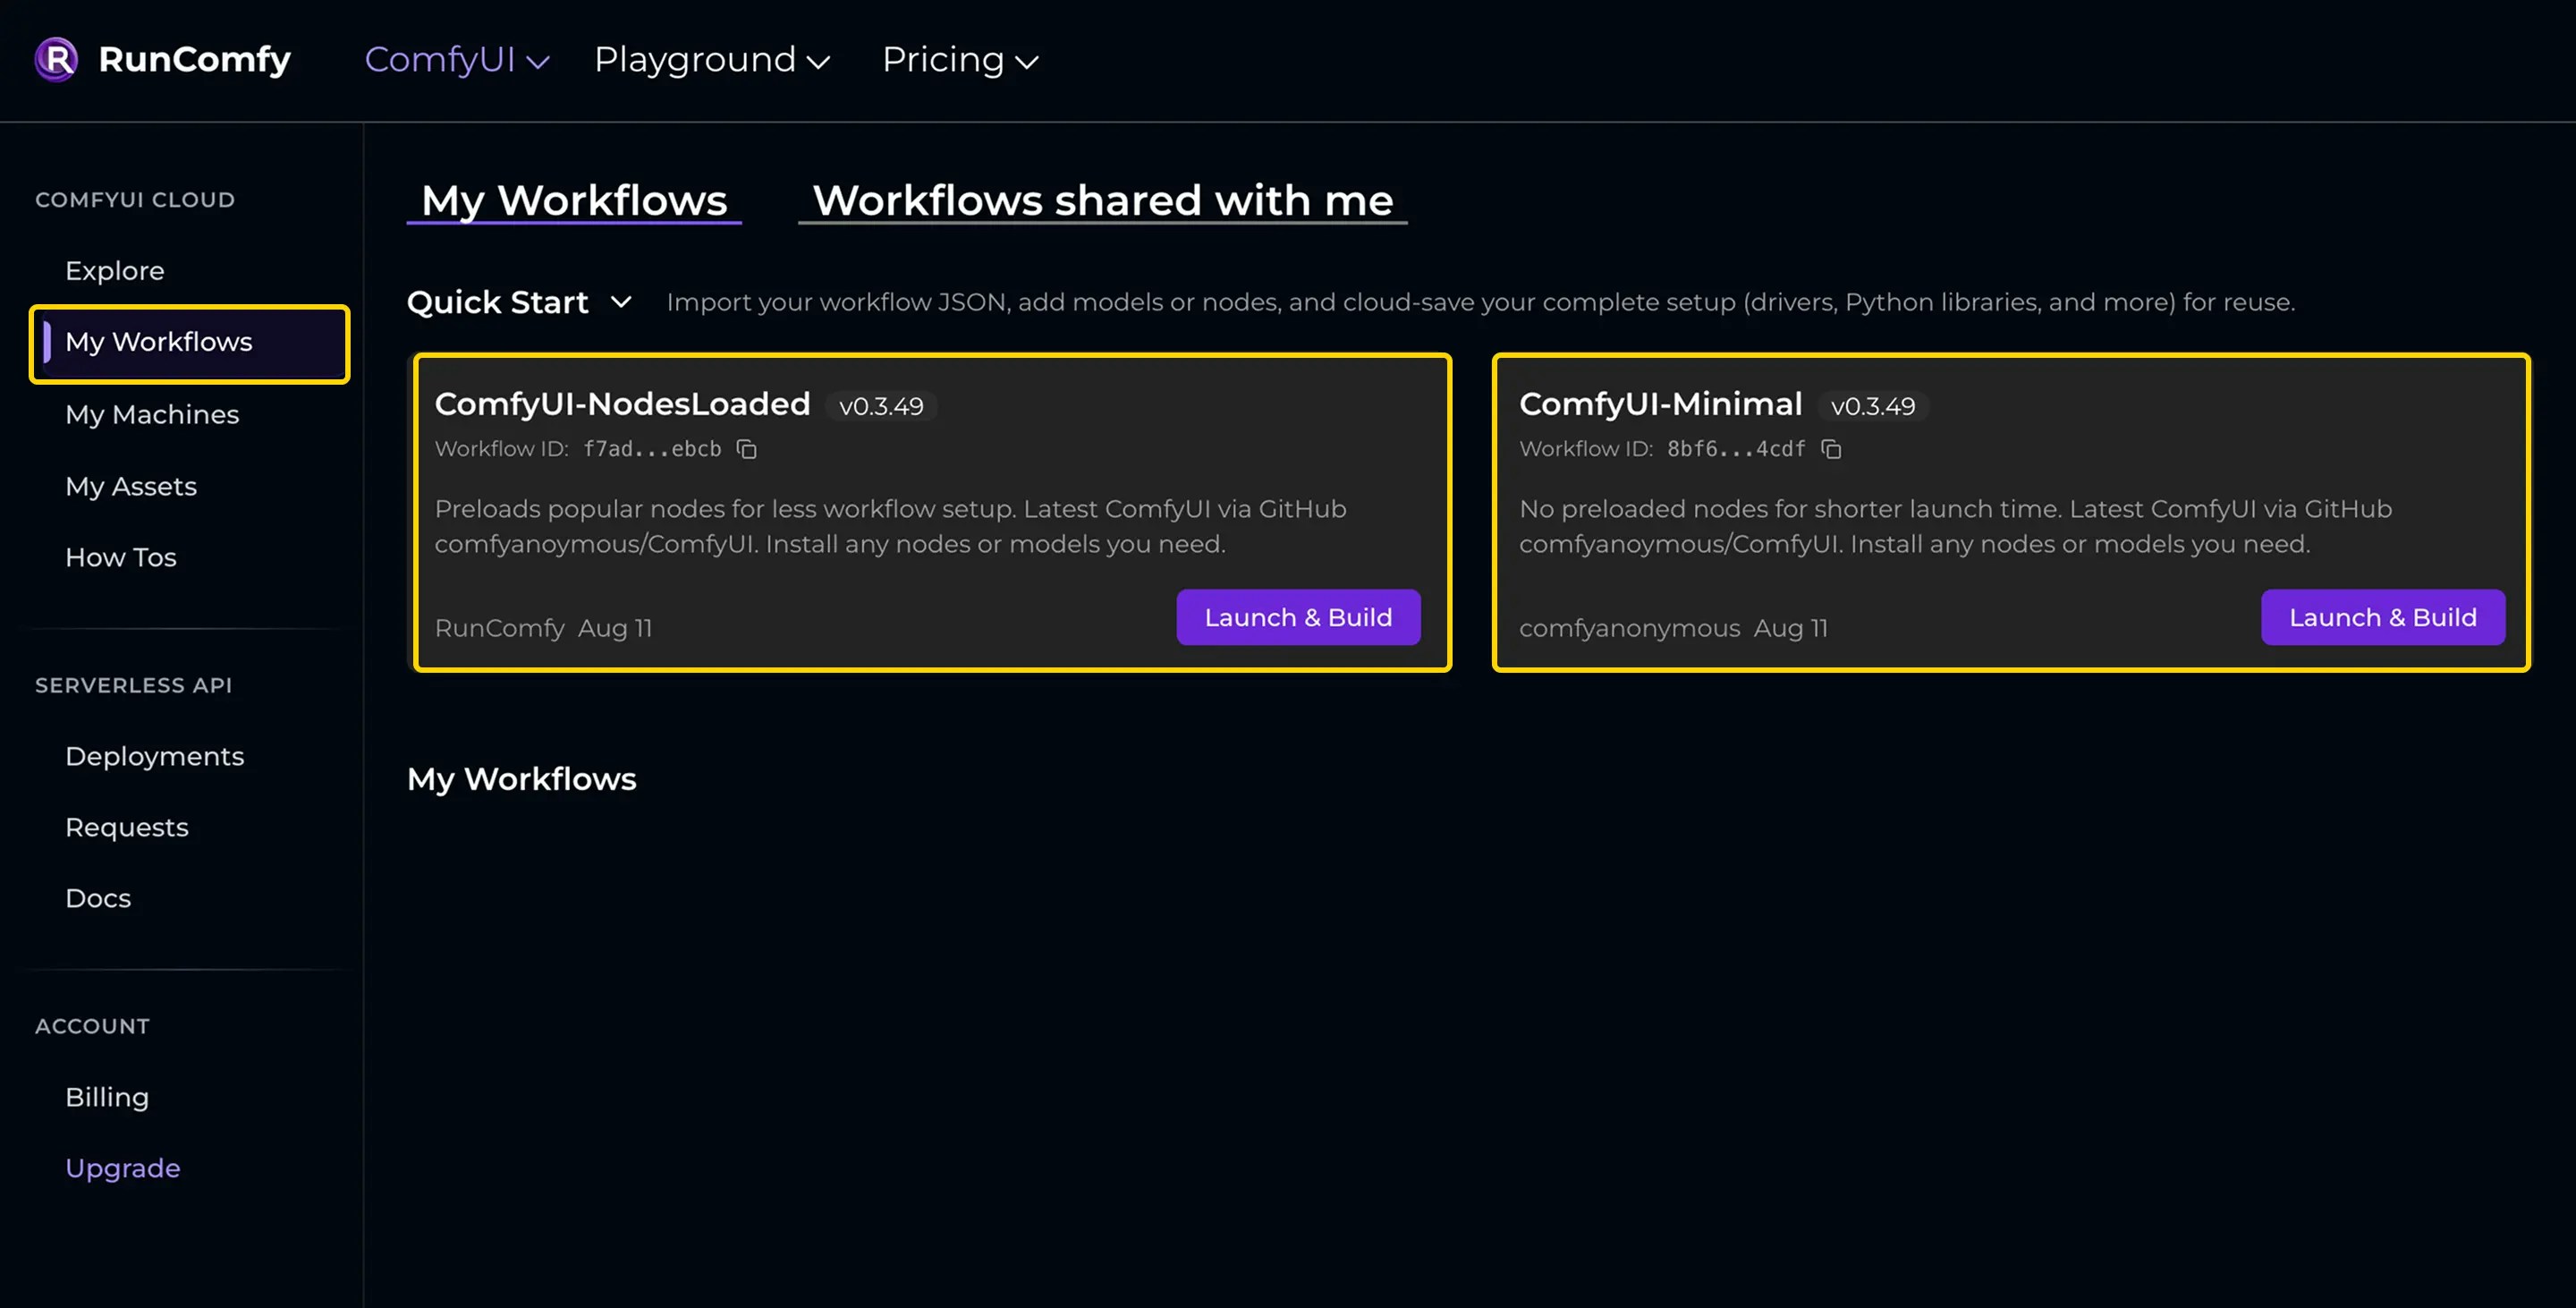
1. Go to **[My Workflows](https://www.runcomfy.com/comfyui-workflows/my-workflows)**.
2. Launch a ComfyUI session.
* **ComfyUI-NodesLoaded**: common nodes pre-installed (slower startup, less setup)
* **ComfyUI-Minimal**: minimal environment (faster startup, more manual setup)
3. Build your workflow on the canvas, or drag-and-drop an existing workflow JSON to import it.
 ### Option B: Use a community template
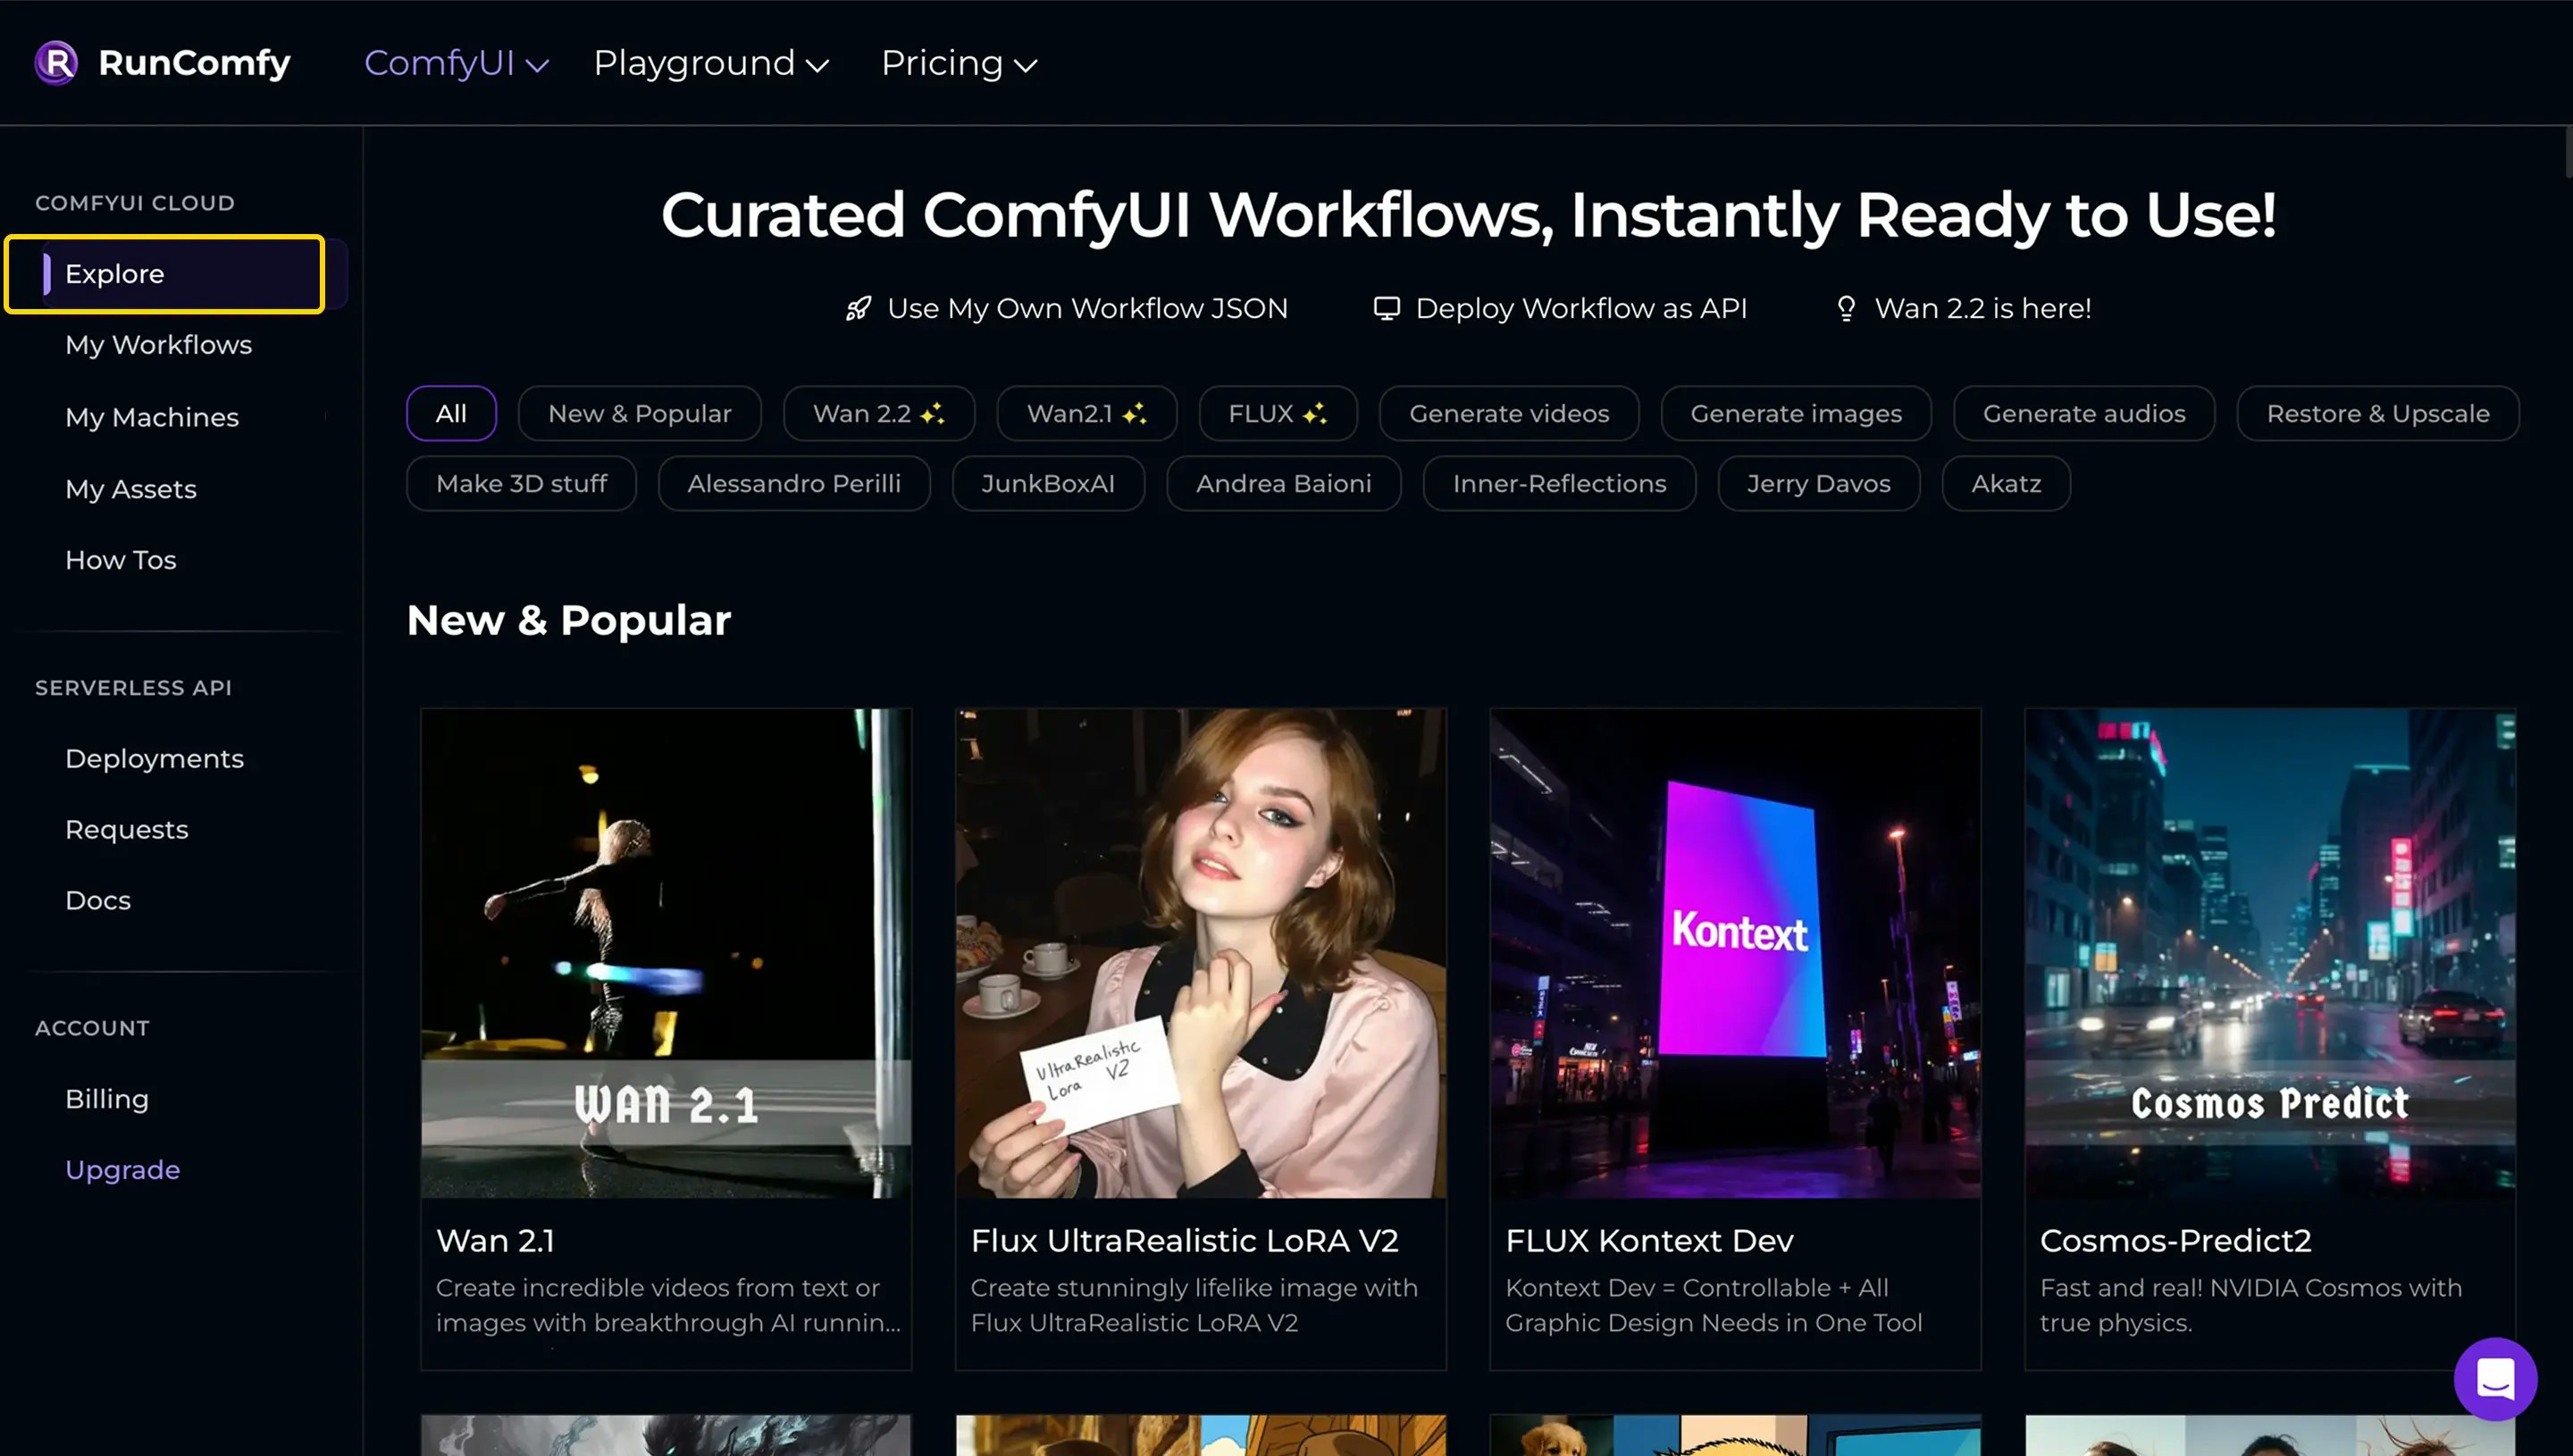
1. Visit **[Explore](https://www.runcomfy.com/comfyui-workflows)**.
2. Browse/search for a workflow.
3. Click **Run Workflow** to load it into a machine instance.
4. Modify it as needed (nodes, models, parameters), then Cloud Save as your own workflow.
### Option B: Use a community template
1. Visit **[Explore](https://www.runcomfy.com/comfyui-workflows)**.
2. Browse/search for a workflow.
3. Click **Run Workflow** to load it into a machine instance.
4. Modify it as needed (nodes, models, parameters), then Cloud Save as your own workflow.
 ***
## Add custom nodes
To install custom nodes:
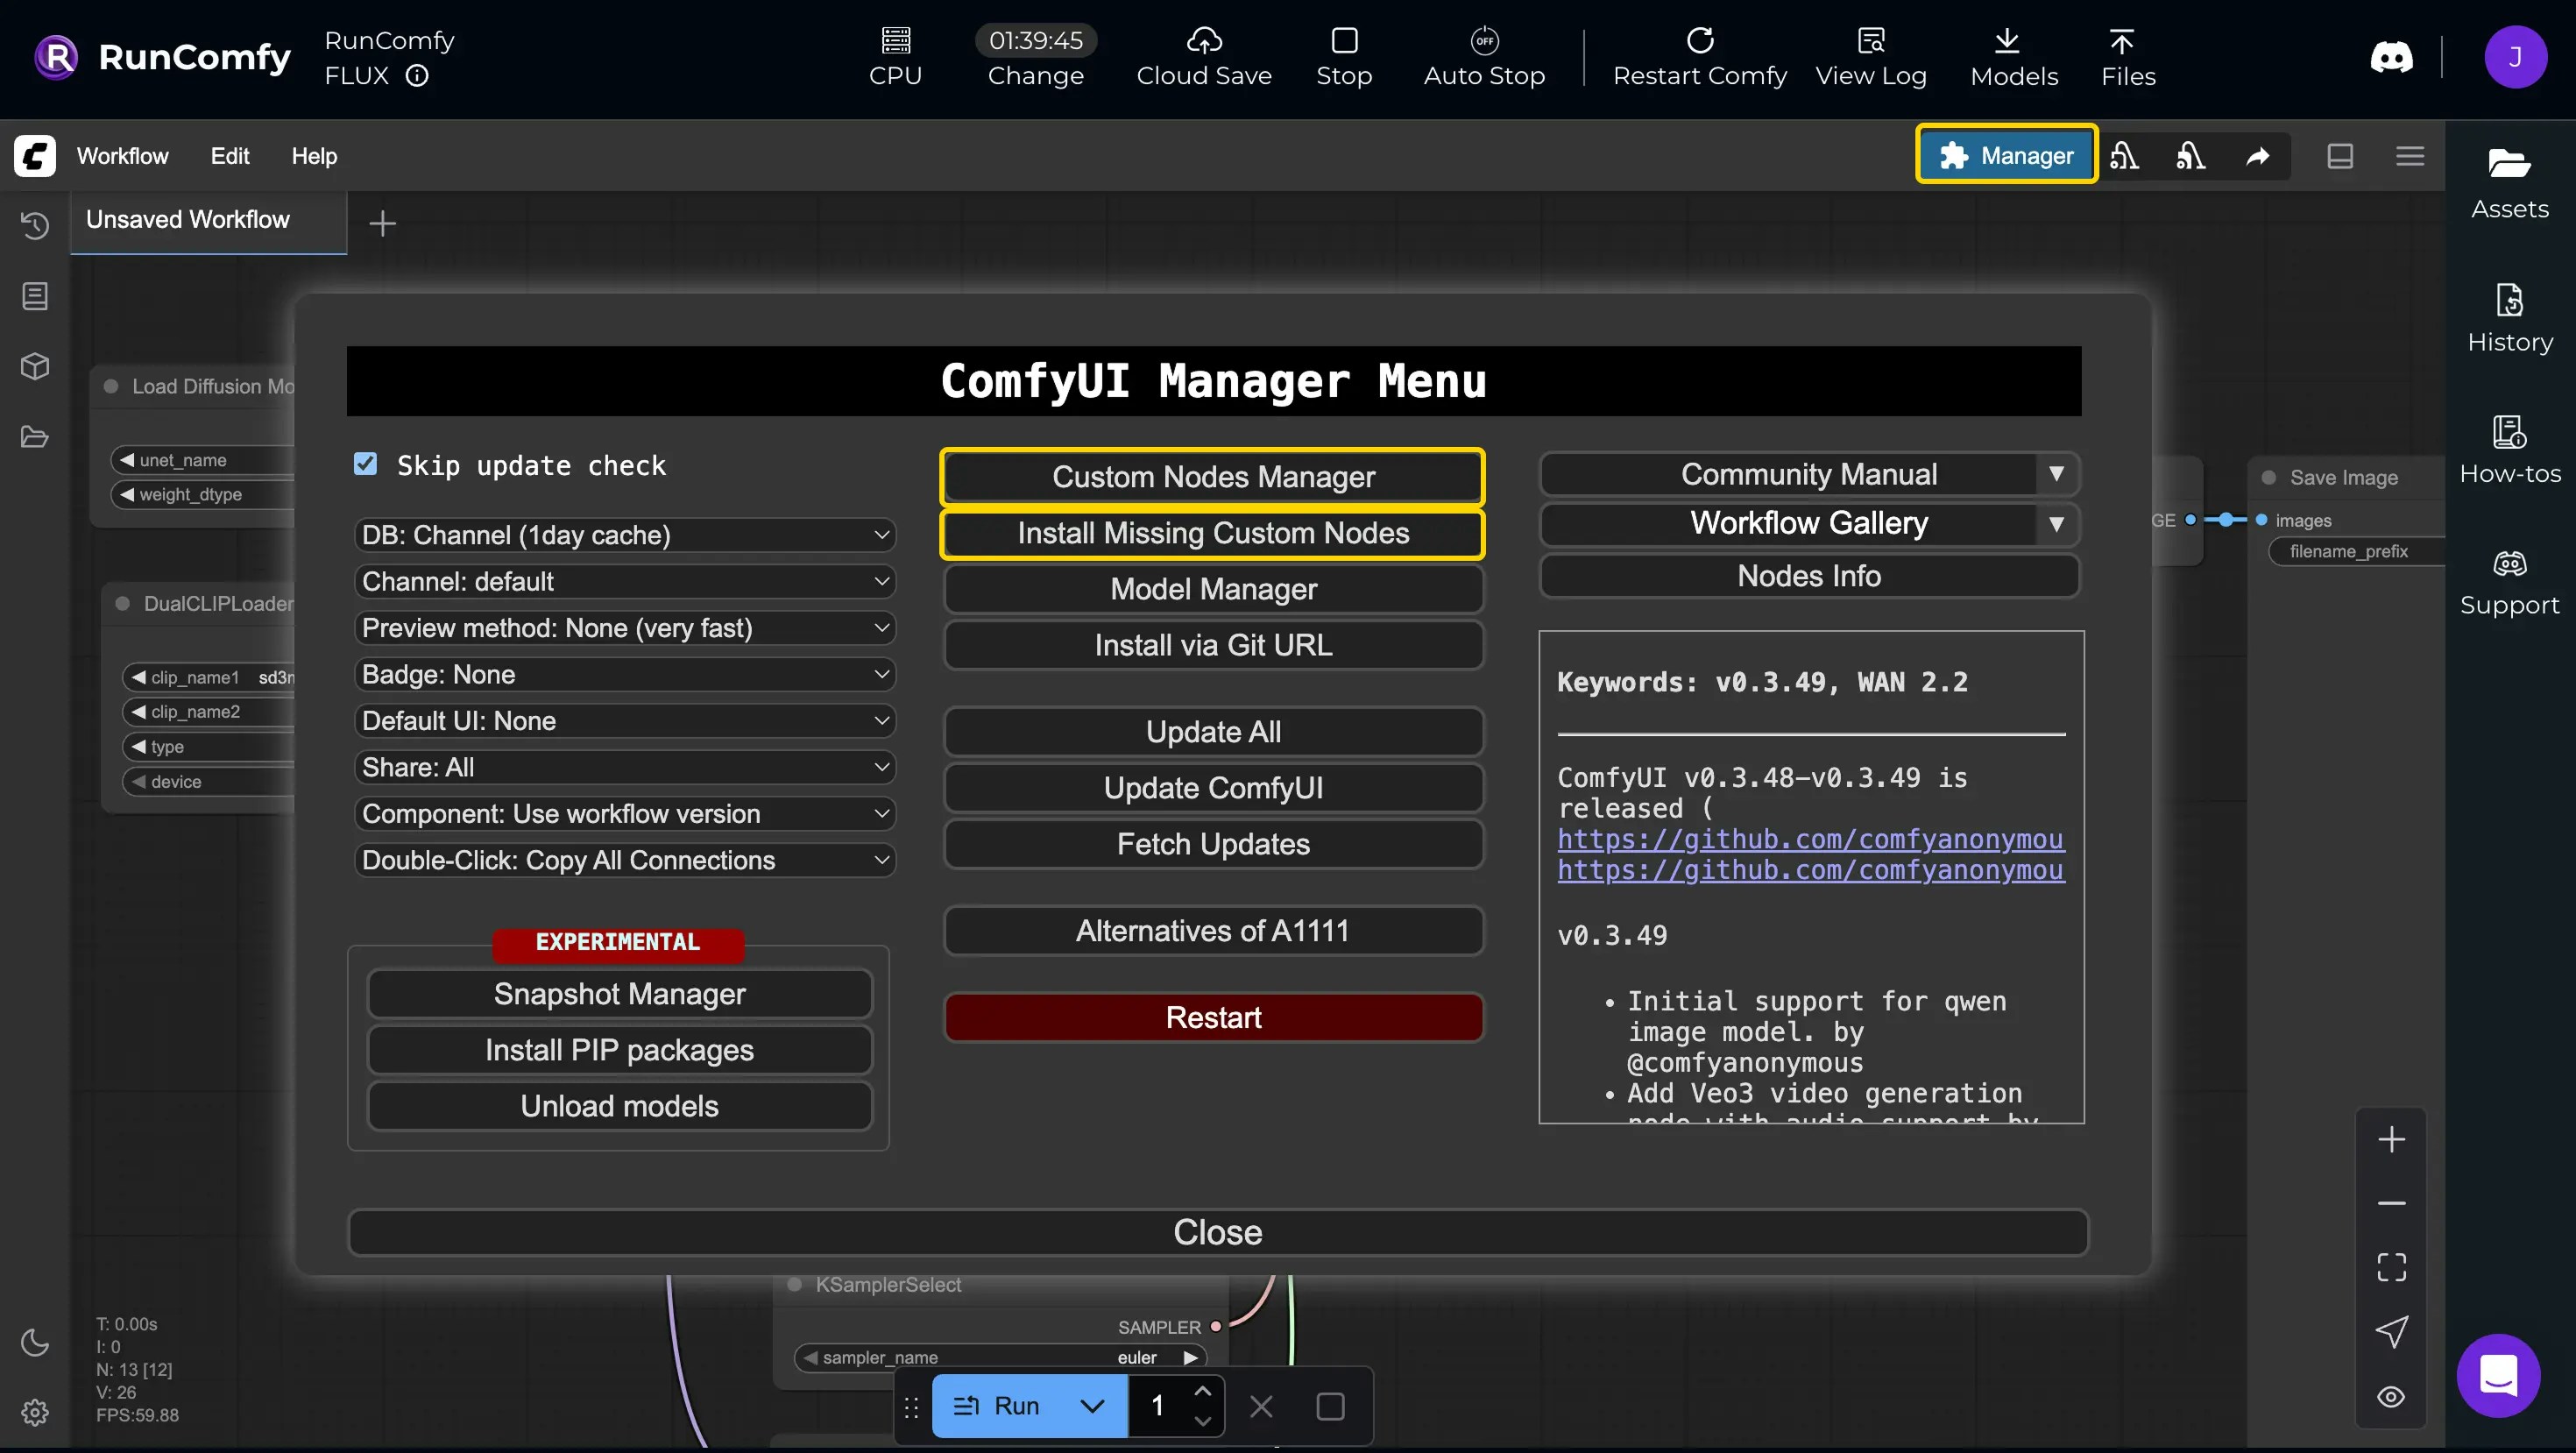
1. Click the **Manager** button.
2. Use **Install Missing Custom Nodes** to auto-detect what your workflow needs, or **Install Custom Nodes** to search and install by name.
3. Restart ComfyUI using the Manager’s restart feature, then refresh your browser.
***
## Add custom nodes
To install custom nodes:
1. Click the **Manager** button.
2. Use **Install Missing Custom Nodes** to auto-detect what your workflow needs, or **Install Custom Nodes** to search and install by name.
3. Restart ComfyUI using the Manager’s restart feature, then refresh your browser.
 ***
## Add models
RunComfy supports downloading models from **Civitai**, **Hugging Face**, and **Google Drive**, and uploading your own files.
### Download models (URL)
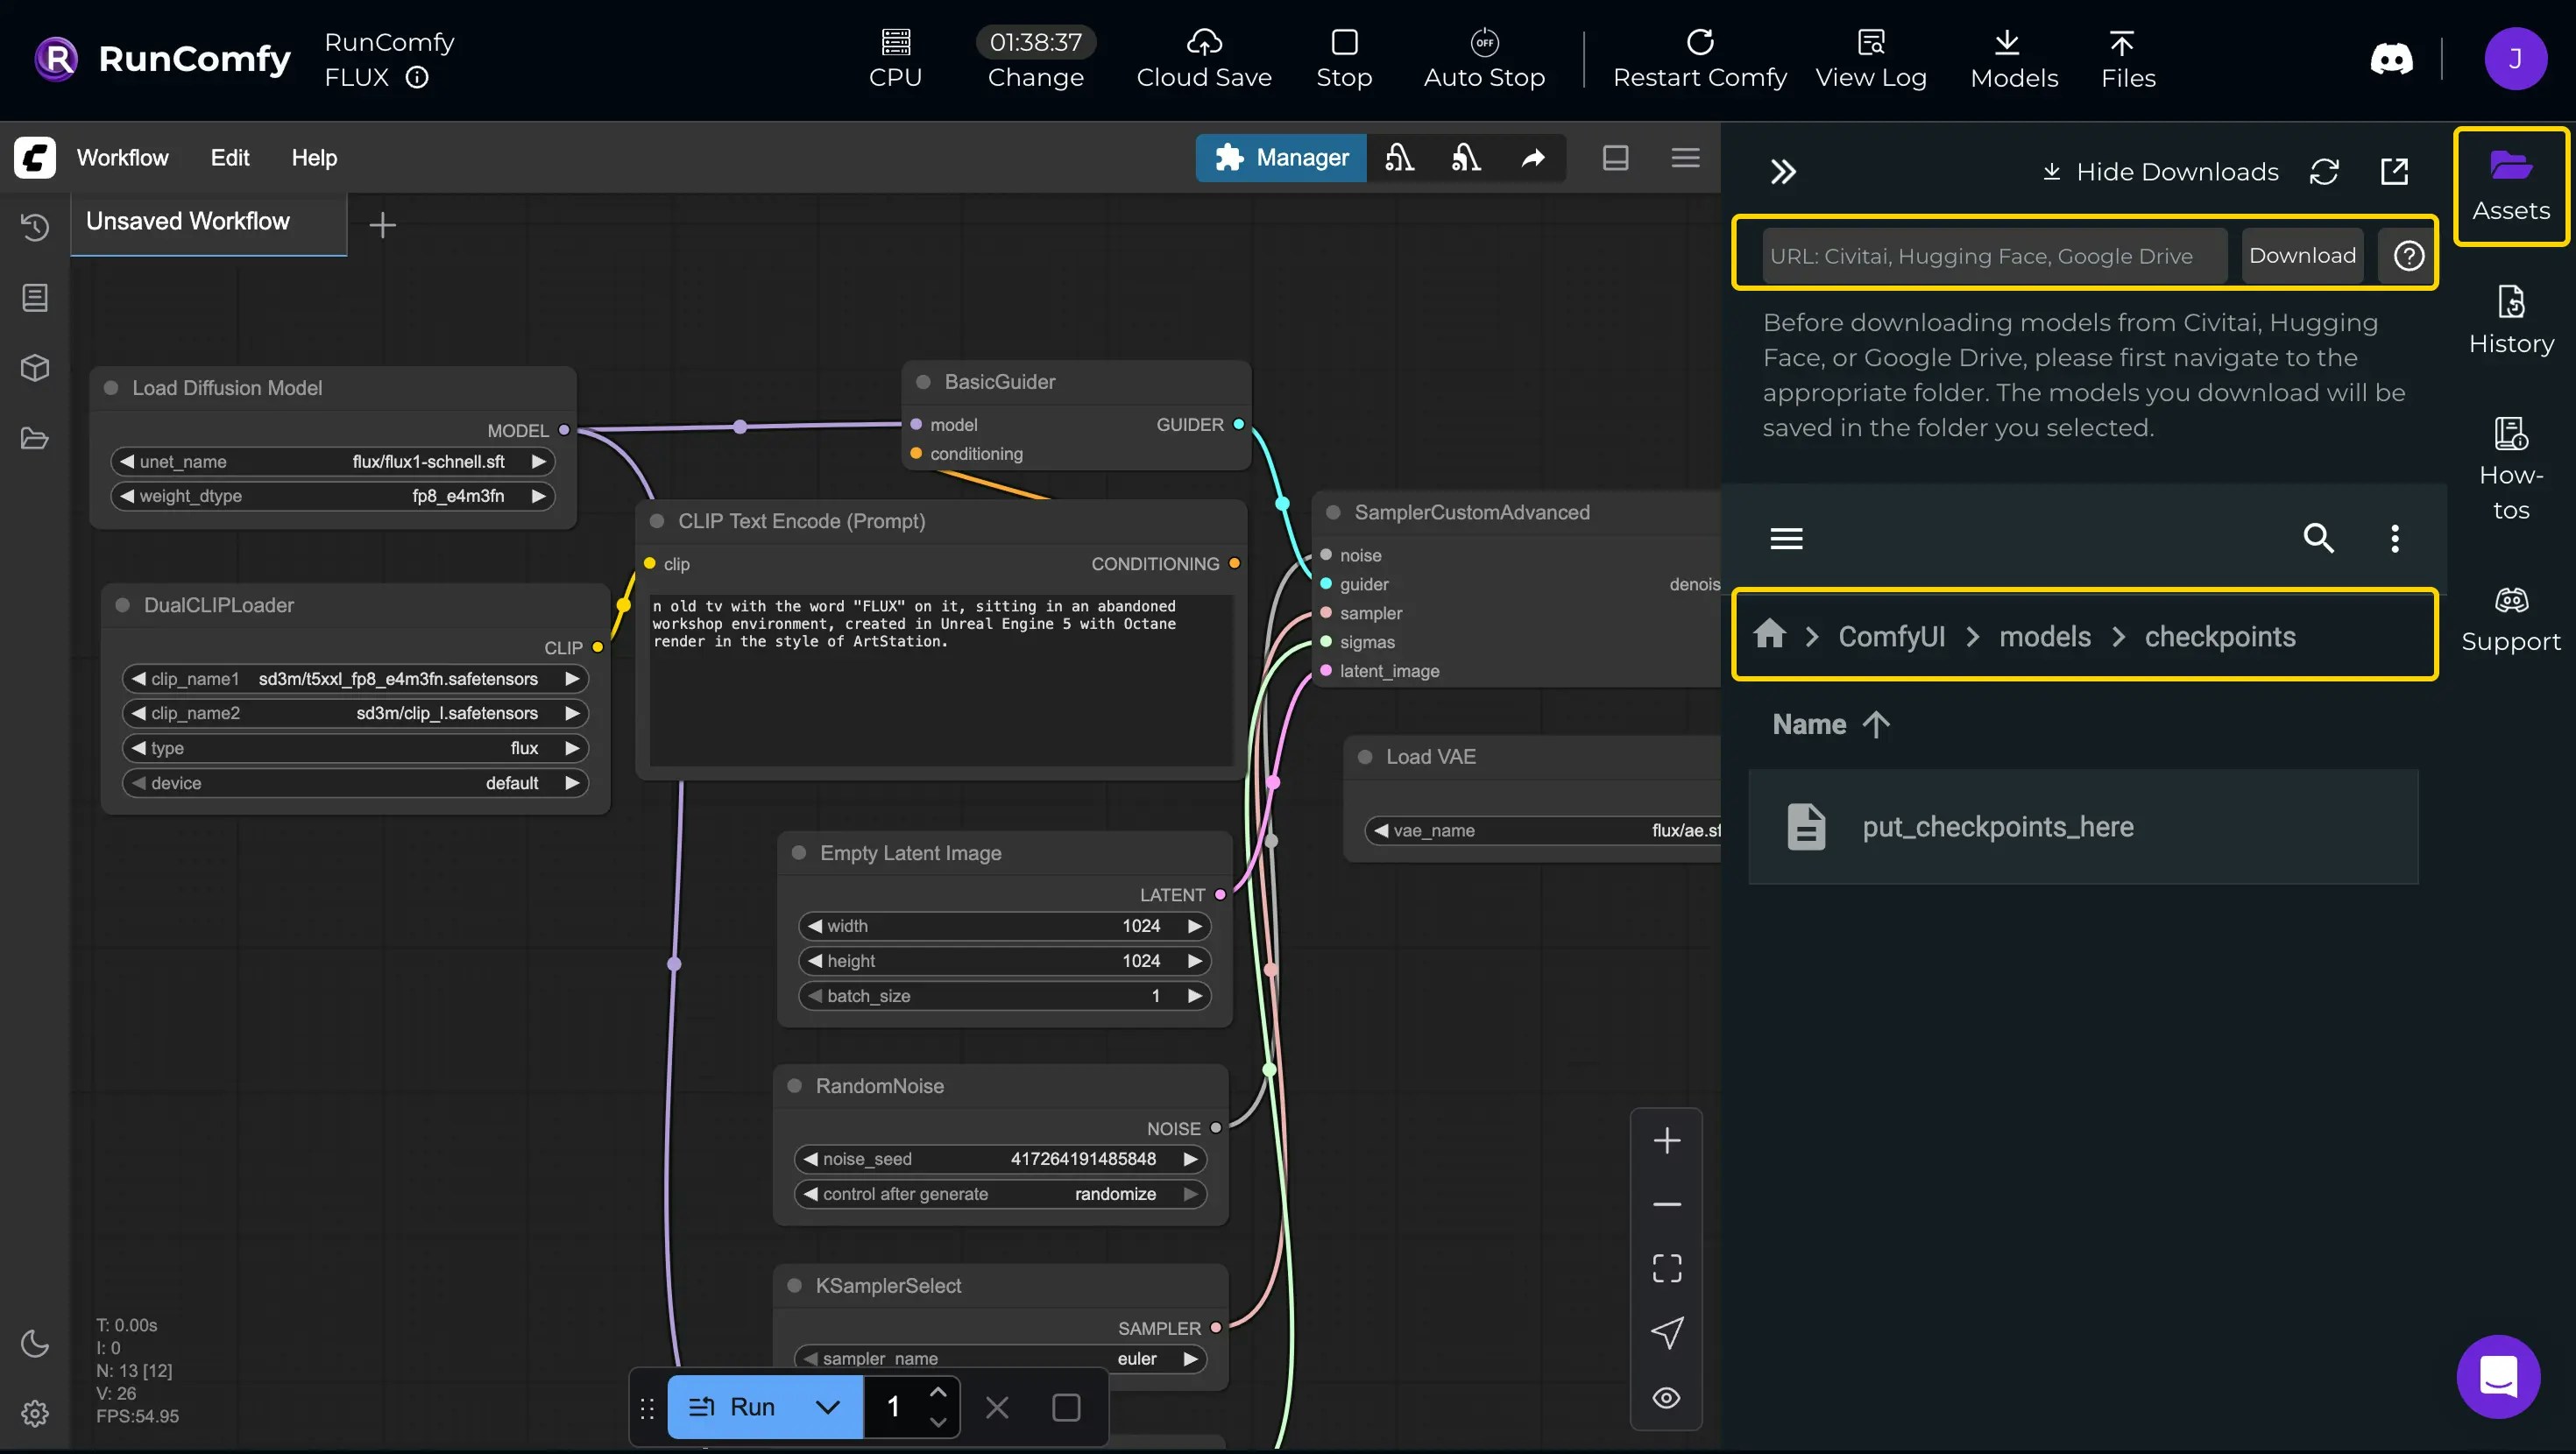
1. Click **Assets** (right sidebar) to open the file browser.
2. Navigate to the right folder (for example `models/checkpoints` or `models/loras`).
3. Paste the model URL into the download bar and click **Download**.
4. Refresh the interface to load the new model.
Read more: [How to download models from Civitai, Hugging Face, and Google Drive?](https://comfyui-guides.runcomfy.com/ultimate-comfyui-how-tos-a-runcomfy-guide/how-to-download-models-from-civitai-hugging-face-and-google-drive)
***
## Add models
RunComfy supports downloading models from **Civitai**, **Hugging Face**, and **Google Drive**, and uploading your own files.
### Download models (URL)
1. Click **Assets** (right sidebar) to open the file browser.
2. Navigate to the right folder (for example `models/checkpoints` or `models/loras`).
3. Paste the model URL into the download bar and click **Download**.
4. Refresh the interface to load the new model.
Read more: [How to download models from Civitai, Hugging Face, and Google Drive?](https://comfyui-guides.runcomfy.com/ultimate-comfyui-how-tos-a-runcomfy-guide/how-to-download-models-from-civitai-hugging-face-and-google-drive)
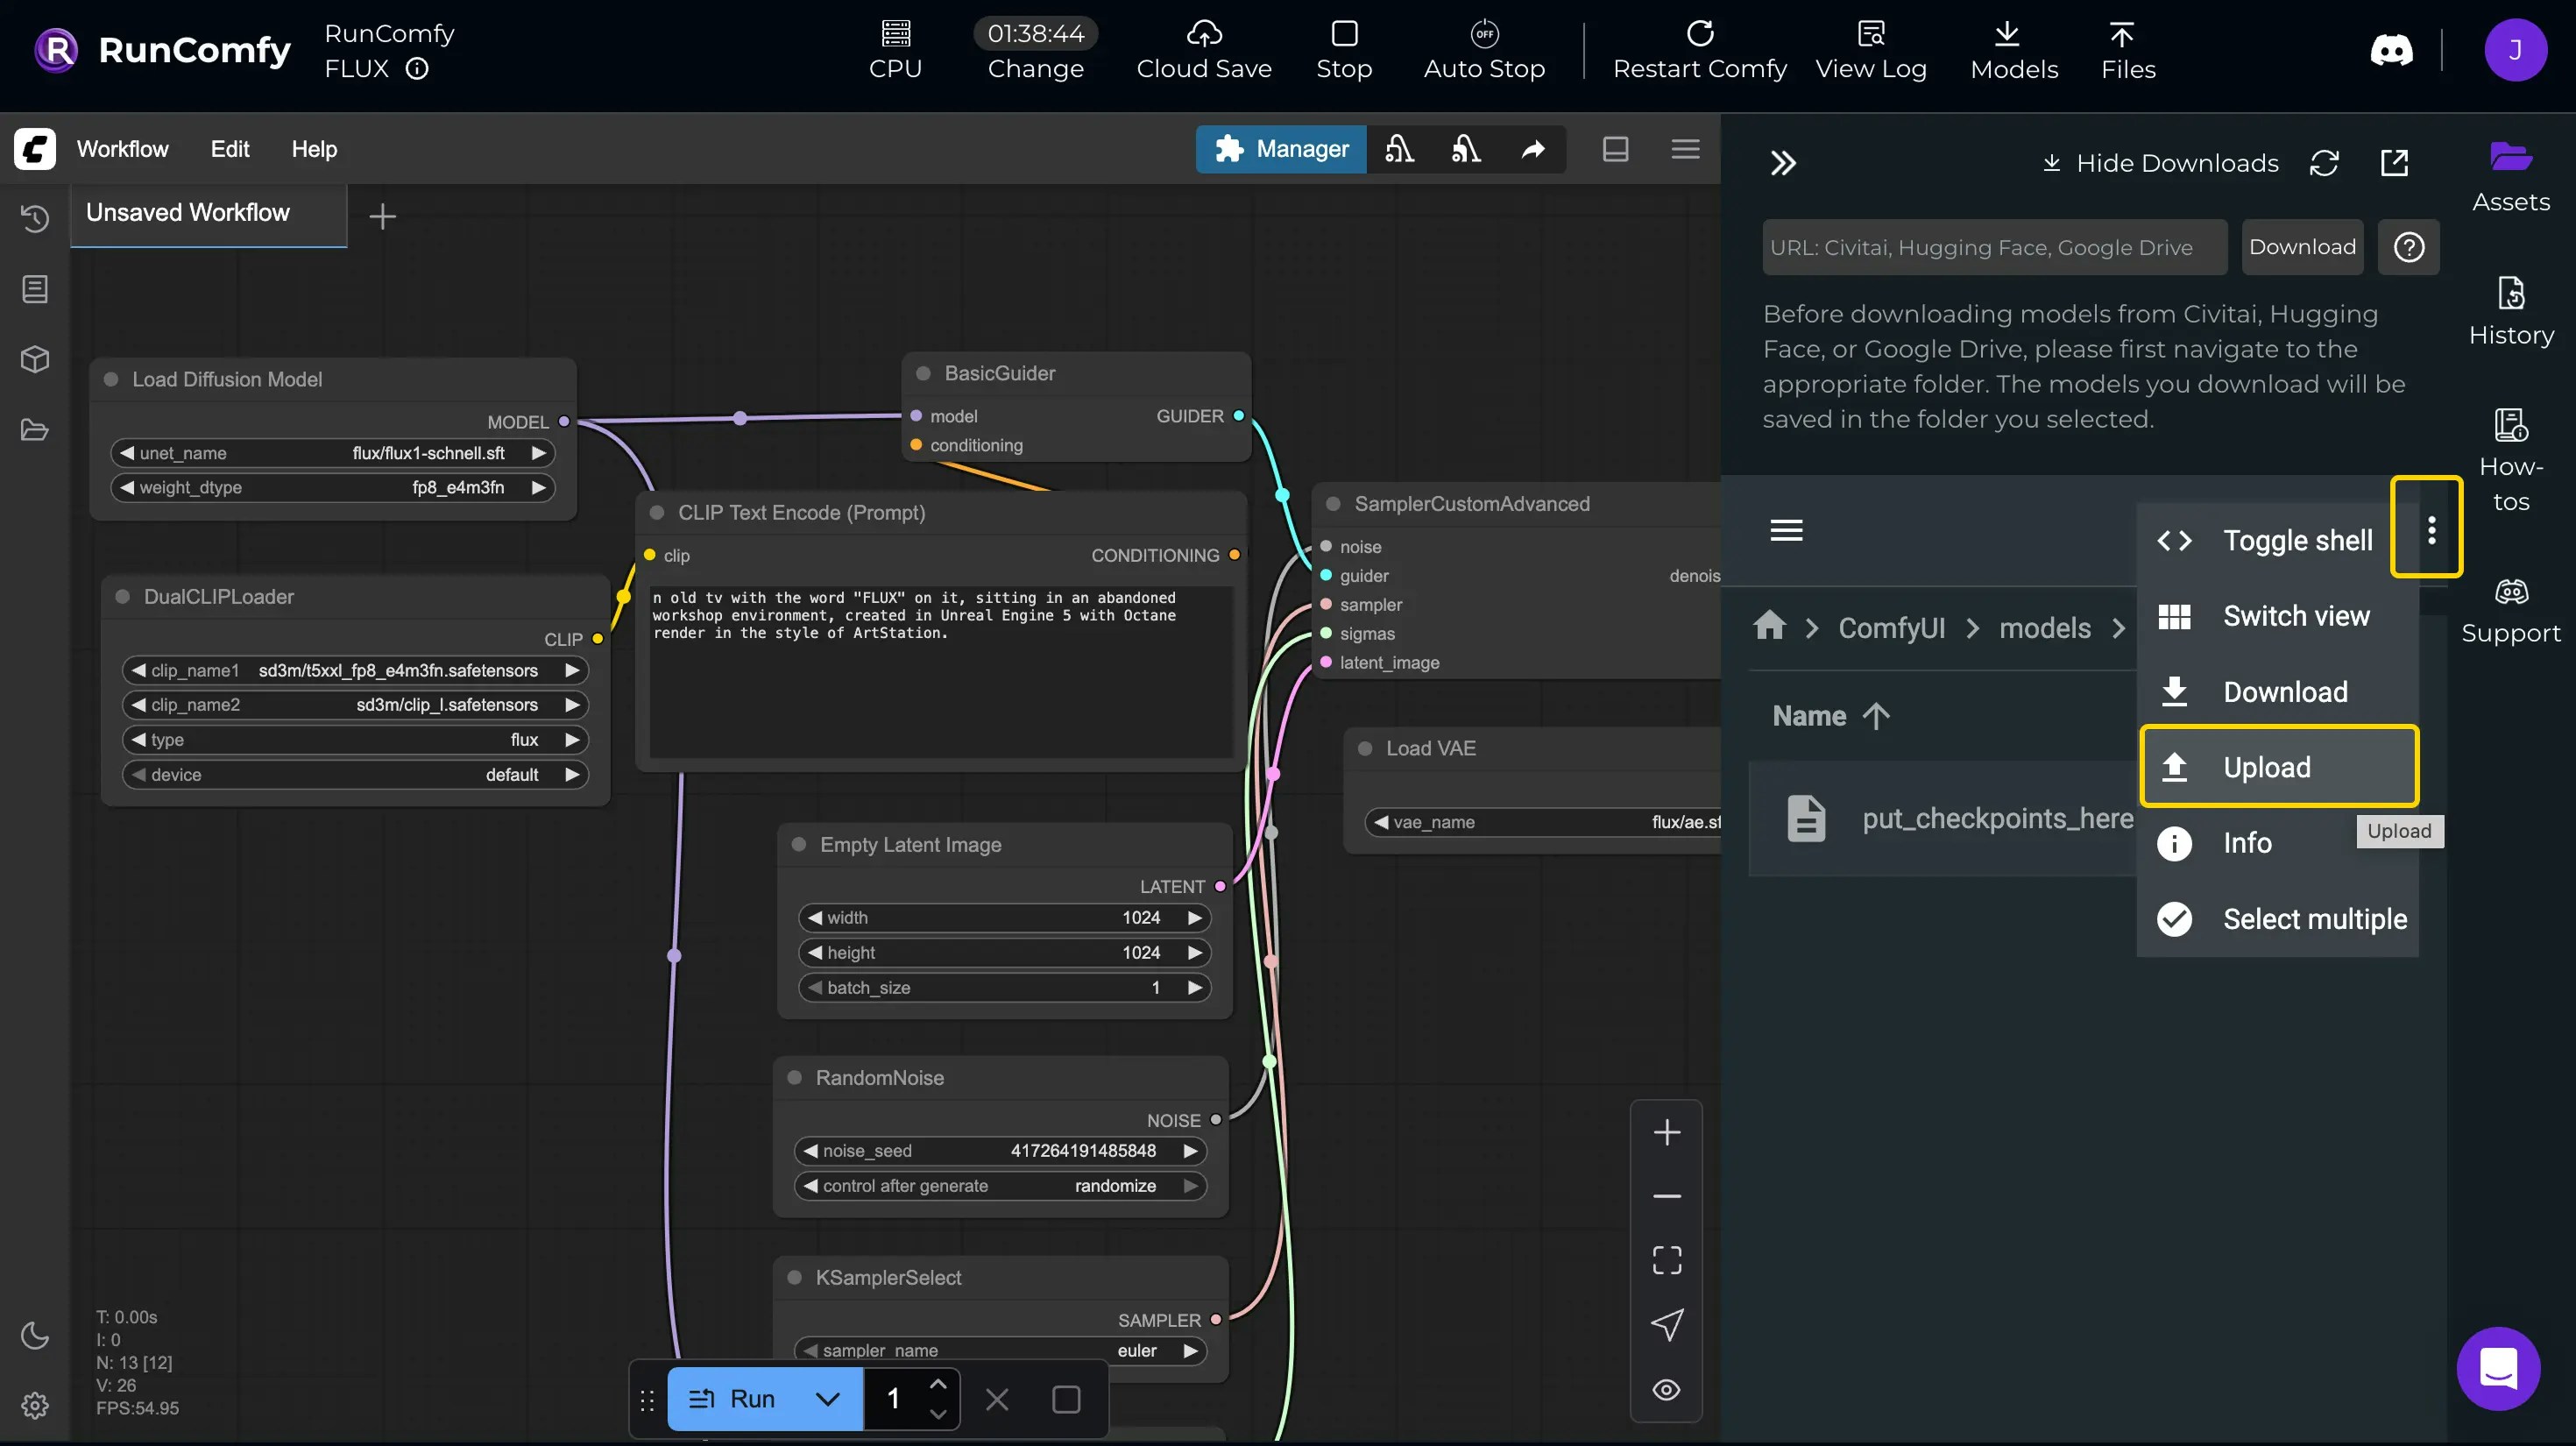
 ### Upload models (local files)
1. Navigate to the target folder in the file browser.
2. Click the three-dot menu.
3. Select **Upload** and choose your files.
Read more: [How to Upload/Delete/Move files in RunComfy?](https://comfyui-guides.runcomfy.com/ultimate-comfyui-how-tos-a-runcomfy-guide/how-to-upload-files-in-runcomfy)
### Upload models (local files)
1. Navigate to the target folder in the file browser.
2. Click the three-dot menu.
3. Select **Upload** and choose your files.
Read more: [How to Upload/Delete/Move files in RunComfy?](https://comfyui-guides.runcomfy.com/ultimate-comfyui-how-tos-a-runcomfy-guide/how-to-upload-files-in-runcomfy)
 ***
## Test the workflow
Click **Queue Prompt** to run the workflow and preview outputs directly in output nodes. Generated files are saved to the output folder.
For debugging:
* check the custom node author’s GitHub repos for errors/issues
* refer to common fixes in [RunComfy’s How-tos](https://comfyui-guides.runcomfy.com/ultimate-comfyui-how-tos-a-runcomfy-guide)
***
## Cloud Save the workflow
**Cloud Saving** packages your workflow and its runtime into a reproducible container image. This enables:
* consistent execution in the cloud
* workflow **versioning**
* private sharing within a team
> Note: Community workflows in RunComfy (from **Explore**) are already Cloud Saved, so you can deploy them immediately or modify and save them as your own.
### Save to cloud
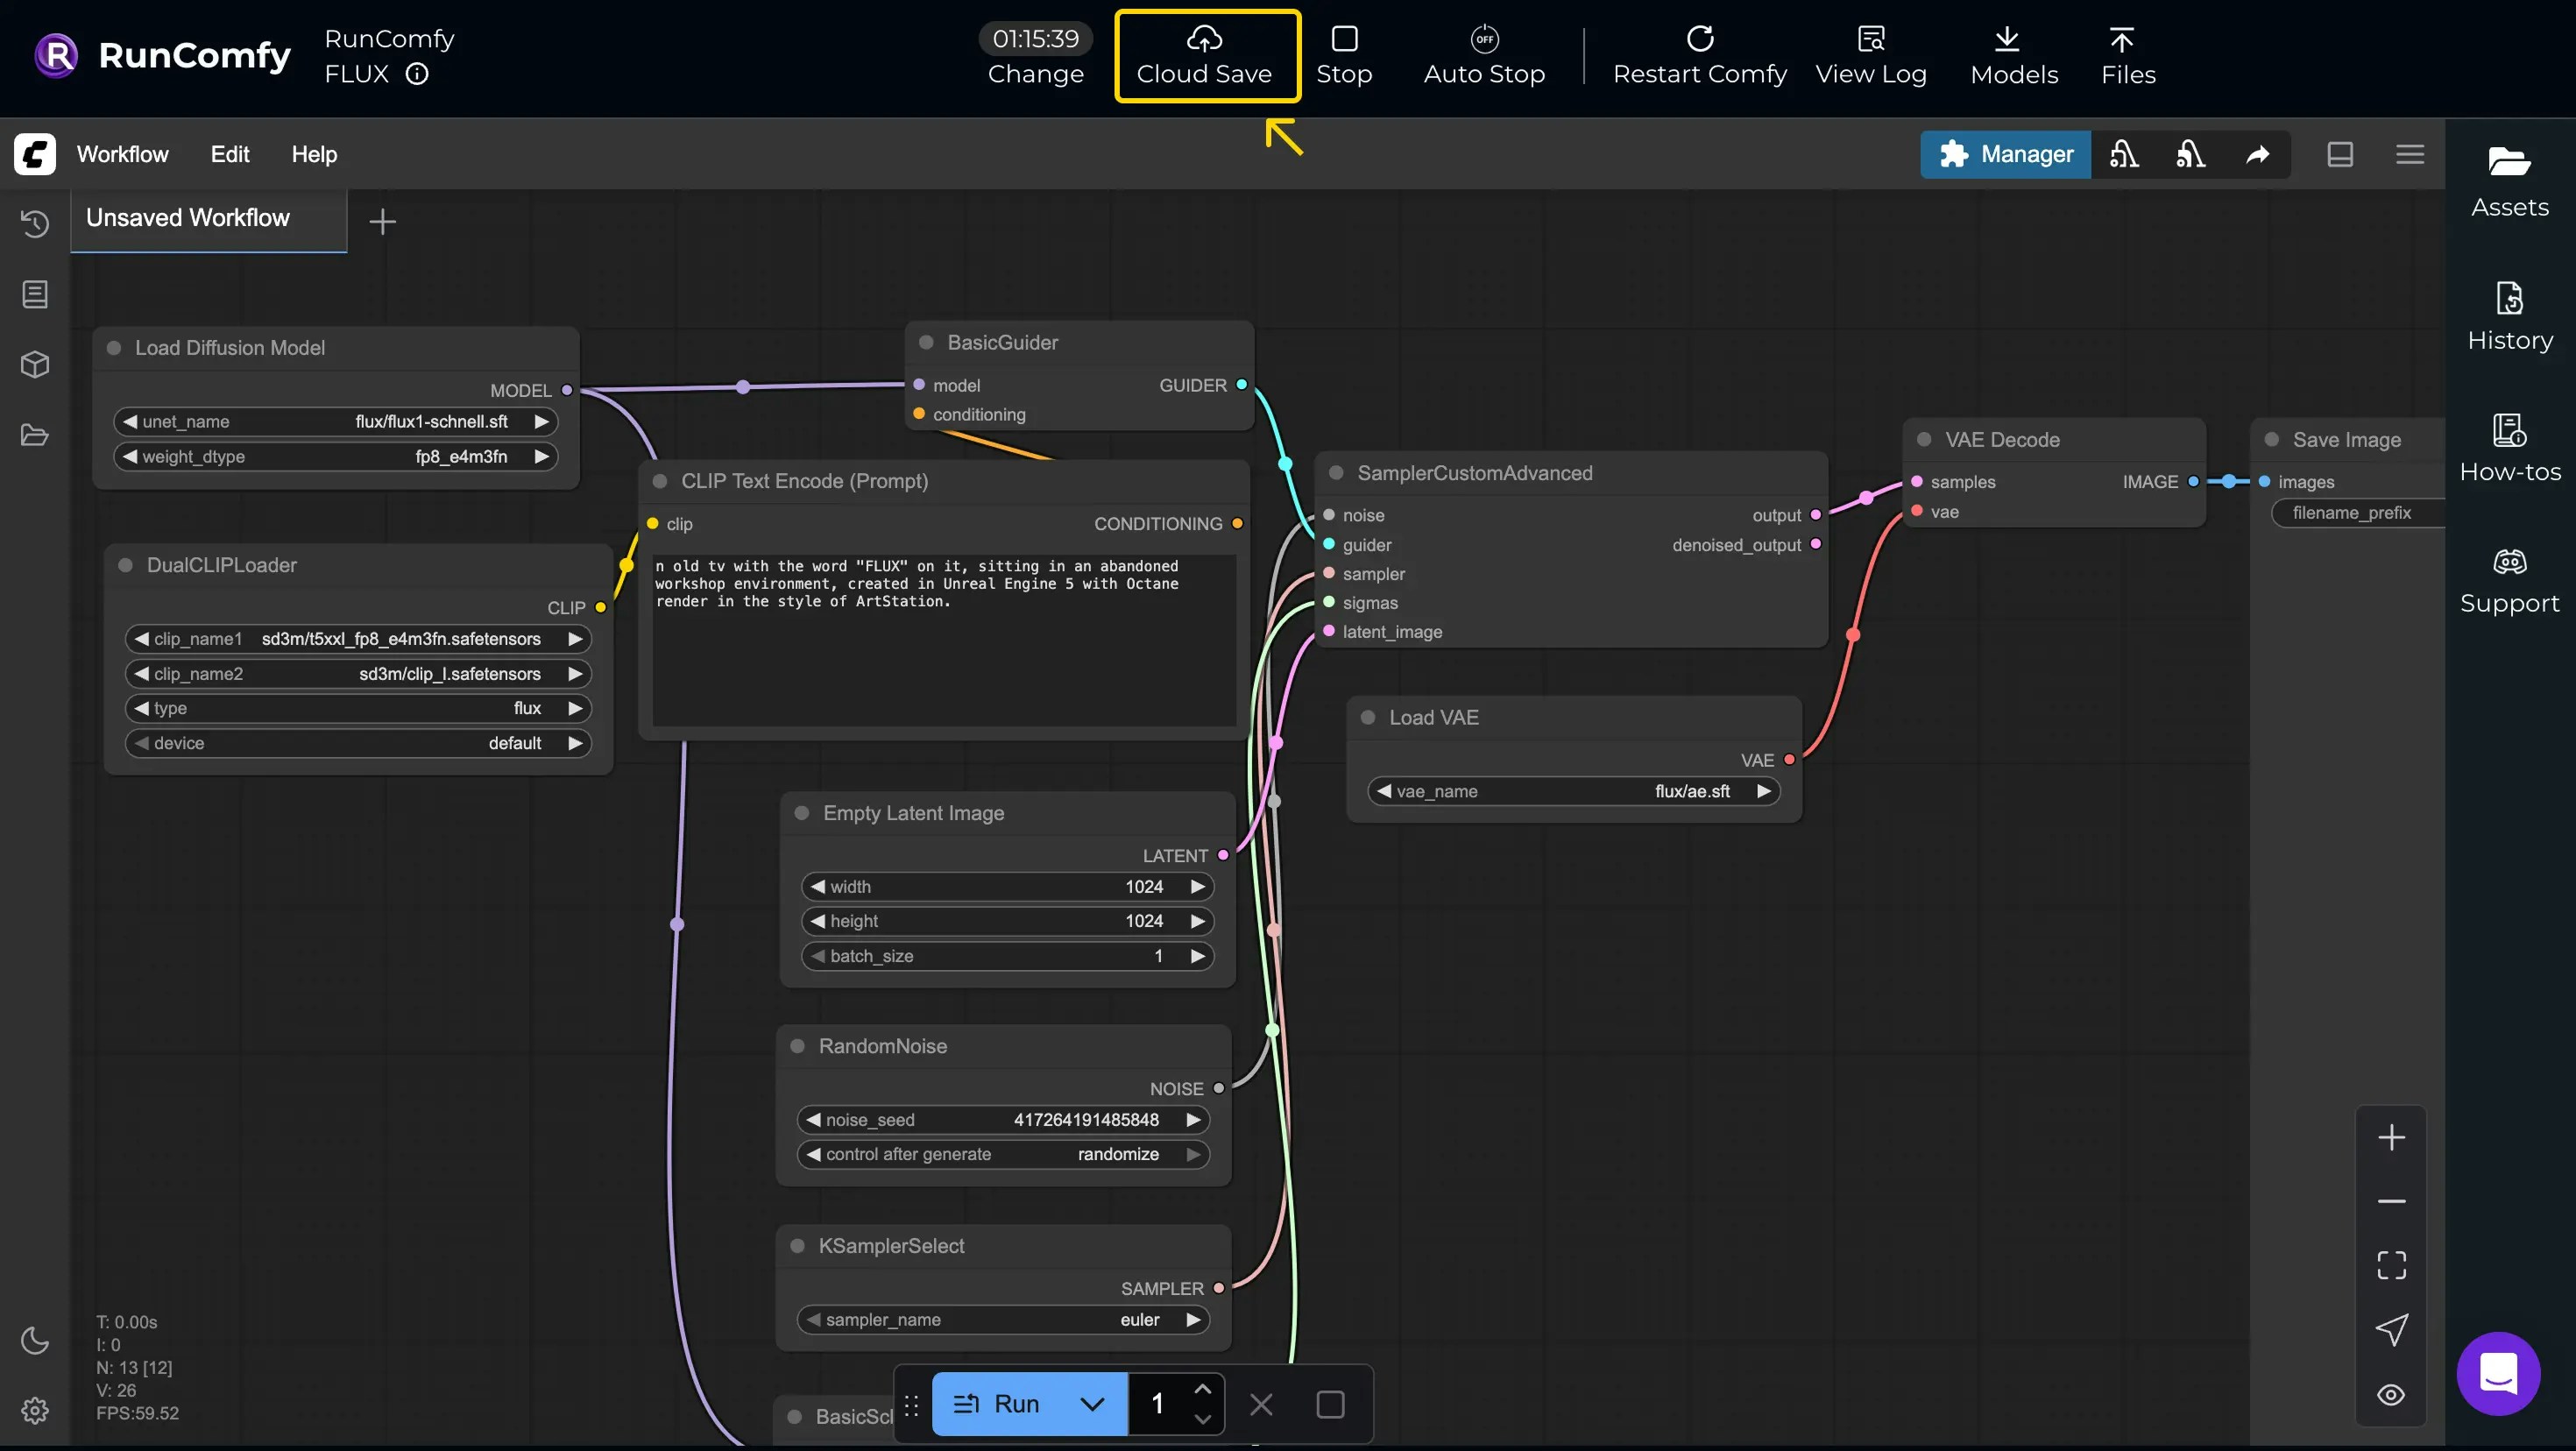
Click **Cloud Save** in the top bar.
> Note: If multiple workflow tabs are open, only the active tab is saved. Save other tabs separately as new workflows if you want to keep each one.
***
## Test the workflow
Click **Queue Prompt** to run the workflow and preview outputs directly in output nodes. Generated files are saved to the output folder.
For debugging:
* check the custom node author’s GitHub repos for errors/issues
* refer to common fixes in [RunComfy’s How-tos](https://comfyui-guides.runcomfy.com/ultimate-comfyui-how-tos-a-runcomfy-guide)
***
## Cloud Save the workflow
**Cloud Saving** packages your workflow and its runtime into a reproducible container image. This enables:
* consistent execution in the cloud
* workflow **versioning**
* private sharing within a team
> Note: Community workflows in RunComfy (from **Explore**) are already Cloud Saved, so you can deploy them immediately or modify and save them as your own.
### Save to cloud
Click **Cloud Save** in the top bar.
> Note: If multiple workflow tabs are open, only the active tab is saved. Save other tabs separately as new workflows if you want to keep each one.
 Read more: [RunComfy ComfyUI Workflow Cloud Save and Sharing features](https://comfyui-guides.runcomfy.com/ultimate-comfyui-how-tos-a-runcomfy-guide/runcomfy-comfyui-workflow-cloud-save-and-sharing-features)
### View saved workflows
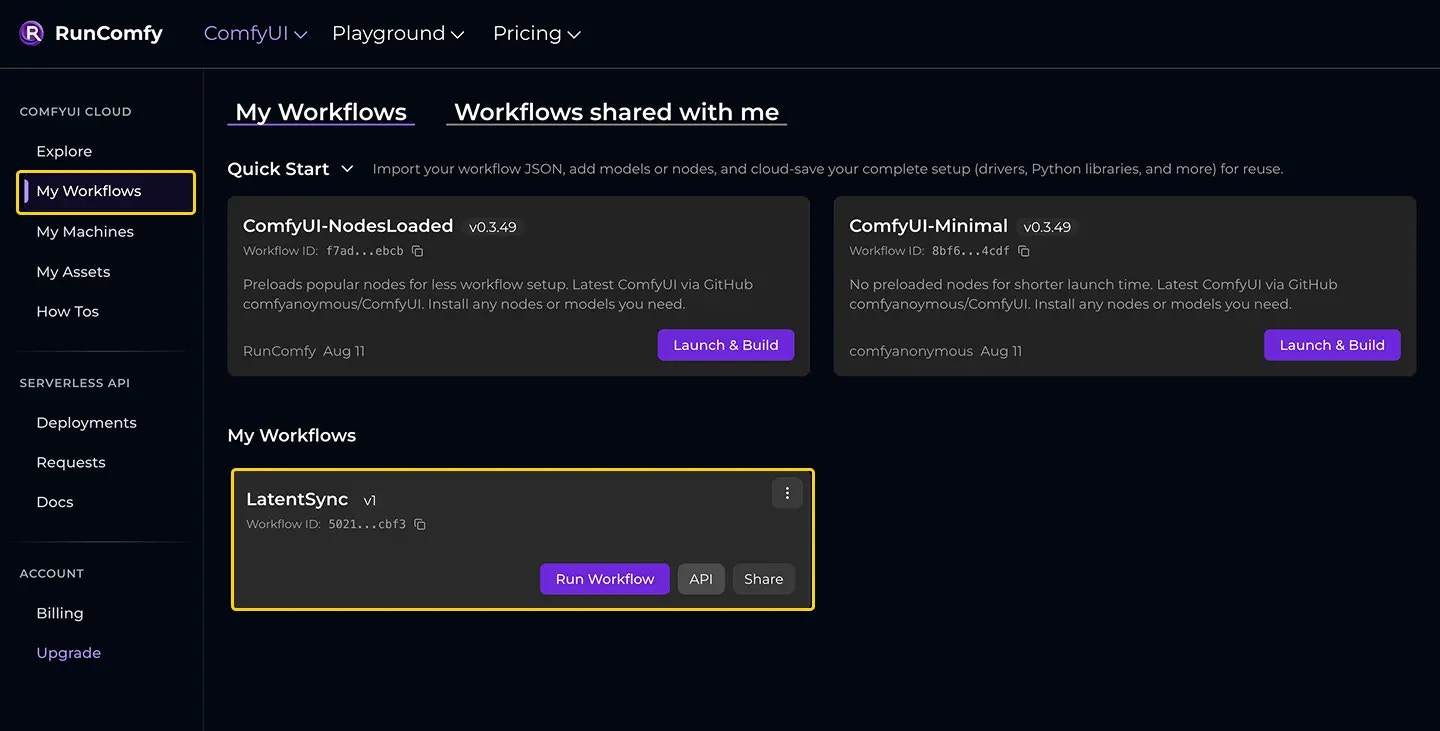
Saved workflows appear on **[My Workflows](https://www.runcomfy.com/comfyui-workflows/my-workflows)**. When you launch again, RunComfy loads the saved version with its environment.
Read more: [RunComfy ComfyUI Workflow Cloud Save and Sharing features](https://comfyui-guides.runcomfy.com/ultimate-comfyui-how-tos-a-runcomfy-guide/runcomfy-comfyui-workflow-cloud-save-and-sharing-features)
### View saved workflows
Saved workflows appear on **[My Workflows](https://www.runcomfy.com/comfyui-workflows/my-workflows)**. When you launch again, RunComfy loads the saved version with its environment.
 ***
## Deploy the saved workflow
Saved workflows are ready to deploy right away:
* Click the **API** button in the workflow UI, **or**
* Go to **[Deployments](https://www.runcomfy.com/comfyui-api/deployments)**, select your workflow, and create a Deployment.
Next: **[Creating a Deployment](/serverless/create-a-deployment)**.
***
## Deploy the saved workflow
Saved workflows are ready to deploy right away:
* Click the **API** button in the workflow UI, **or**
* Go to **[Deployments](https://www.runcomfy.com/comfyui-api/deployments)**, select your workflow, and create a Deployment.
Next: **[Creating a Deployment](/serverless/create-a-deployment)**.